Tuesday, August 31, 2010

Wedding Arbor

This project goes through the building of my wedding arbor that I put to good use on June 5, 2010 when I married Dana.  The first two pictures below take a look at the finished arbor as it was at the wedding.


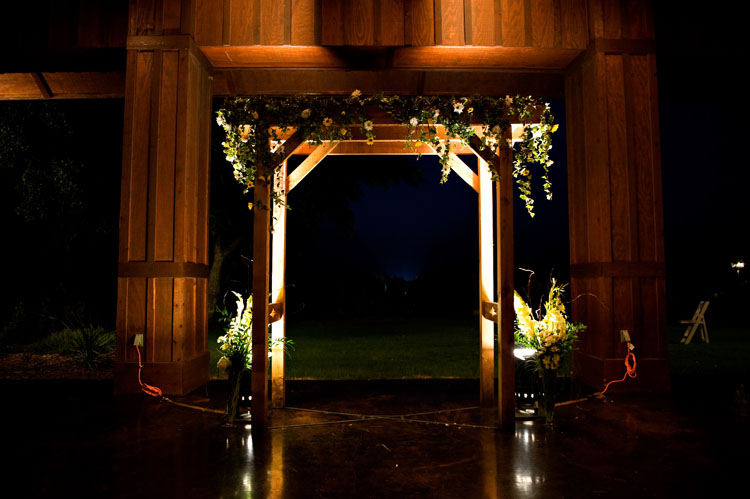
The location we got married at had a small white round arbor, however it looked small and wimpy, and didn't really go with the look of the whole facility.  Our solution? Build one that better fit what we wanted and gave us something that we would be able to keep forever from our wedding.  For that reason I decided to build it with cedar, a wood with natural oils that preserve it for years and years.  The following pictures will go through the process of its build.

I started by constructing the two sides, using 4"x4" posts for the corners and 2"x6" boards for the top rails.  The top had three 2x6s running longways, with the center one notched out to fit within the cross-members.


In order to put the whole arbor together I built it upside down which allowed me to easily attach the larger boards and keep it all square.  The bottom of the arbor has a large metal X that keeps the legs from flexing.  This was probably unnecessary in the end, but it did help keep its shape during the build and certainly won't hurt anything.  I routed out a channel at the base of the legs for the metal pieces to sit in.


I then flipped it right side up and put the center board in place. 


At this stage the core of the arbor was complete, leaving the smaller detailed pieces.  On the top I attached numerous 1"x2" cedar boards, and between the legs I placed a small 2"x6" with a diamond shape cut out.


That wraps up the arbor- a pretty simple design that worked out perfectly for us.


End.

Saturday, March 13, 2010

Frontier Headache Rack

I'm switching it up a bit with this post... showing a recent metal project rather than wood.  This was a headache rack for a Nissan Frontier that my brother and I built one Saturday for his truck.  He had looked for one already made from different suppliers, but none seemed to offer a decent looking rack for mid-size pickups.  The ones offered where either ugly, ridiculously expensive, or both. Usually both. Our solution? Build one from scratch that actually fits the truck - one that goes with the lines of the truck to make it unnoticeable, while still offering the cab protection from lumber or whatever else is being hauled.


The first step in building this rack was making the base that fit the bedrails.  All the support for the load being hauled will come from this foundation, so it was vital to give it enough strength while not leaving big bulky brackets behind.  We went with 1.5" angle iron, going back down the bedrails about 15" to give it additional support to prevent it from twisting.


After welding up the base we then made the vertical supports running up from the base.  We made these to be just taller than the roof of the cab in order to still be useful while not sticking out and looking out of place.


The two main vertical supports shown, as well as the main lateral piece, were both made using square tubing. These were the largest pieces used on the rack, and chosen to ensure it had the strength it needed.  Some of the remaining vertical and lateral pieces were made using smaller round tubing, but those provided more support to the square rack rather than carrying loads themselves.  In the second picture above you can see me beginning to work some of that round tubing which would be used for the two center supports.

The two center supports were placed in line with the rear window lines to help keep the view clear from inside the cab.  The outer two supports were made using smaller round tubing bent on a pipe bender.


We continued the same lines started with the outer supports through the entire rack...


Finally after adding the rest of the inner lateral supports the unit was all complete- the only thing remaining was cleaning it up and painting.


And the final shots of the rack installed with a fresh coat of black paint...


End.


Saturday, February 6, 2010

TV Stand

This project is a TV Stand that I put together for about 50 bucks using all simple pine boards from home depot. I thought about doing some sort of wood combo with a nicer top, but then I realized that the whole thing will be covered by a tv and equipment; so why not make it cheap and easy.  The original idea was to make it with a channel in the back to hide all the cords.  i did this from the top to the shelf, but forgot about the cords from the equipment to the power, etc.  If I could do this project over I would expand on that concept and build a channel all the way from the top down through the center shelf and to the floor.  This would allow you to hide all the wires and leave a very clean install.  It would also need to be a bit larger than what I made as when its all put together there are a boat load of wires.  If none of that made sense hopefully the pictures will better explain.


The first step was putting together the top.  This provided a bit of a challenge as I was working with the cheap pine as I mentioned (and I didn't have a planner yet either).


Next up, building some legs.  The outside four corners and the front center leg are all solid 4x4s that I sanded down to flatten the sharp edges. The center leg back is solid from the shelf to the floor, but a fake leg from the shelf to the top to allow cord access.  They were probably a little bigger than I would have wanted, but again, cheap and easy.  The first picture shows two different leg styles that I was trying to decide between.


After completing the sold legs I began the shelf, the fake leg, and then topped the unit with the table top (with I had been using as a base to build off of)


For the stain I went with a reddish brown minwax to try and match some existing furniture I had.  It worked out alright, not perfect but what can you do?


This next picture shows that fake leg pretty well.


And the installed look:


End.